
Pro Tools Functions, Tips and Tricks for Sound Design
/Here is a compilation of tips and tricks for sound design and editing with Pro Tools. Some of these shortcuts could be obvious to the seasoned Sound Designer but you’d never know, you might learn a new trick or two. For the purposes of this post, I’ll assume that most readers are Mac users, although most of this content should also be PC-compatible.
The post contains short videos which demonstrate the shortcuts discussed in each section. If you have Pro Tools at hand, I would recommend that you open it and follow along. Let's go!
Use memory locations to mark sync points and scene changes.
Pretty basic but worth mentioning. You can add memory locations to your timeline and use them to mark certain key moments. As you import new clips to your session, these markers will be very helpful in lining up different layers. You can also jump between markers with shortcuts, which is particularly useful in long sessions with multiple scene changes.

| Shortcut | Function |
| Enter (numeric keyboard) | Create new marker at playhead position. |
| Cmd + 5 (numeric keyboard) | Open the memory location window. |
| Opt + Click on marker | Deletes the marker. |
| "." (numeric keyboard) + marker number + "." (numeric keyboard) | Jump to a marker location |
Note: If your numeric keypad is on Classic Mode you can skip the first "." when recalling a memory location.
Using X-Form + Elastic Properties
This is my preferred method for quick clip pitch and length changes. It doesn't work very well for big changes but is good enough for small adjustments and you can tweak both parameters independently This is not a real time process, the changes are rendered offline and you'll keep the original version if you need to go back to it.
To use this method, you will need to activate X-Form in the track elastic properties, it's just under the track automation mode. (Video Bellow)
X-Form pitch changes work great when you have a sound that is similar to what you need but you feel it needs to be a little bigger or smaller in weight. The results are not always natural sounding, but adjusting the pitch can sometimes bring a clip close to the sound you're looking for.
Also, being able to change the length of a clip makes your library instantly bigger. Now your clips may work on more situations as you can make them shorter or longer to fit in context.
And don't forget this tool could be also used as a creative resource. Listen to the following clip where some plastic bag impacts are extremely slowed down, creating a weird, distorted kind of Sci-Fi sound. You can hear bellow the original sound first and then the processed one.
| Shortcut | Function |
| Alt + 5 (numeric keyboard) | Opens the elastic properties for the selected clip. |
Tab to transients.
Again, pretty basic but super useful. When activated, (under the trim tool or with the fancy shortcut) you can use the tab key to jump between transients instead of clip boundaries. Very handy when editing steps, gun shots or impacts.
This function is great when working with just a few short clips, but If you just want to create clip separations on transients on a long file with loads of steps, the best to do this would be to use the function "Separate Clip on Transients".
| Shortcut | Function |
| Opt + Cmd + TAB | Toggles "Tab to Transients" on and off. |
| TAB | Jump between transients or clip boundaries. |
| B | Separate Clip. |
| No official shortcut, but keep reading for a workaround! | Separate Clip on Transients |
Shortcuts in the ASDFG keys (cuts and fades).
Naturally, my left hand is usually in a WASD position but when editing in Pro Tools, your fingers should be on the ASDFG keys to allow you to quickly trim and fade clips. It might take some time to get used to using these, but in no time at all, it will become second nature. Remember that you need to be on keyboard focus to use these.
| Shortcut | Function |
| A | Trim Start |
| S | Trim End |
| D | Fade In |
| F | Cross Fade |
| G | Fade Out |
Ctrl + click to move a clip to the playhead position.
To align two clips, select the clip to which you want to align the other(s) and then press Ctrl + click on the second clip to align them.. Also works on markers. Simple and neat.
Move a clip from one track to another without changing its sync.
Just press and hold Ctrl while moving a clip from one track to another and it will keep its timeline position no matter how much you horizontally move your mouse.. Add Opt to the shortcut to also duplicate the clip.
Fill gaps.
This is very useful when you have an unwanted noise on an ambience track.
To eliminate the offending noise, first select it and press Cmd + B to remove it. Then select and copy another similar region in the audio clip, ideally longer than the gap you have removed. Lastly, select the area to fill and do a paste special repeat to fill selection. You can then cross fade the boundaries to make it seamless.
You can use this method rather than copying a section of audio and having to adjust the clip manually to fill the gap.. this shortcut does that tedious work for you!
Last thing, if your selection when copying is smaller than the gap itself, Pro Tools is going to paste the same clip several times until the gap is filled. It will also create crossfades between these copies of your selection. This won't probably sound very smooth but it may work if the gap is not very big and/or the scene is busy.
| Shortcut | Function |
| Cmd + B | Clear or remove selection from clip. |
| Opt + Cmd + V | Paste special repeat to fill selection. |
Easy access to your most used plugins
You can select your preferred EQ and Compressor plug-ins by going to Setup > Preferences > Mixing.
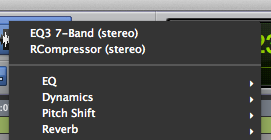
You can also select you most commonly-used plug-ins to appear at the top of your inserts list, by holding Cmd and then selecting the relevant plug-in in an insert slot. This also works with AudioSuite plug-ins.
Have Audiosuite plugins at hand with window configurations.
The previous trick will allow you to have your AudioSuite plug- ins at hand but there is an even quicker and better way to quickly access AudioSuite plugins.
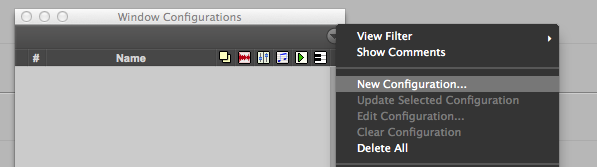
First, open the AudioSuite plugin of your choice, you can even do this with more than one plugin at the same time. Now, create a new window configuration using the Window Configurations window or the shortcut. You can then call that window configuration to summon the plugin or even incorporate it in a memory location as you can see in the picture on the right.
Keep in mind that window configurations can do much more than that, you can save any edit and/or mix window distribution set up and easily toggle between them.

| Shortcut | Function |
| Opt + Cmd + J | Open Window Configurations. |
| "," + Number from 1 to 99 + "+" (Numeric Keyboard) | Create new window configuration. |
| "," + Window Configuration Number + "*" (Numeric Keyboard) | Recall window configuration. |
Or impress your friends with custom shortcuts...
Memory locations + Window configurations are very powerful. But there is hidden feature that may be even better for accessing Pro Tools functions. You can create your own custom shortcuts for unmapped commands and without any external macro software.
As far as I know, this only works on mac. Just go to Apple > System Preferences > Keyboard > Application Shortcuts and add Pro Tools to the list if it wasn't there already. Now you can create (Plus symbol button) a new shortcut to any Pro Tools function your heart desires as long as that function appears on any Pro Tools menu. Even AudioSuite plugin names. You just need to type the exact name and then add the shortcut you want to assign to that given function.
This blew my mind when I discovered it, you can now access loads of functions even if they are buried under 3 sub-menus.
Here is a list of some of the custom shortcuts I'm currently using, I tend to use Control as the modifier key since Pro Tools doesn't use it much:
| Shortcut | Exact function name | Description |
| Ctrl + C | Color Palette | Pimp those tracks! |
| Ctrl + S | Izotope RX 6 Connect | Opens the window to send audio to RX |
| Ctrl + R | Reverse | AudioSuite Reverse Plugin |
| Ctrl + V | Vari-Fi | AudioSuite Vari-Fi Plugin |
| Ctrl + T | At Transients | Separates a clip on its transients |
| Ctrl + E | EQ3 7-Band | AudioSuite EQ Plugin |
| Ctrl + G | Render | Renders Clip Gain |
| Ctrl + P | Preferences... | |
| Ctrl + D | Delete | Deletes empty tracks |
| Ctrl + Opt + D | Delete... | Deletes non-empty tracks |
| Opt + Cmd + S | Save Copy In.... | |
| Ctrl + Opt + Cmd + B | QuickTime... | Bounce to Quicktime |
As you can see, you need two distinct shortcuts to delete tracks since the dialog is different depending on the contents of the track. With the set up I have, using "Ctrl + Opt + D" will always delete the track, regardless of its content, but it will only show the warning window if the track has content on it.
Of course, these are only the ones I currently have, I change them all the time. There are many other functions that you could hook up like I/O, Playback Engine, Hardware, Make Inactive (for tracks). Go nuts!
Automation Follows Edit is your friend.
By default, is a good a idea to keep this option on, so when you move a clip, its automation moves with it. But sometimes, especially when doing sound design, you want to swap a clip with another without moving the automation so you can hear how the same processing affects a different clip.
Just remember to turn this back on when you finish or you may mess things up badly. In newer Pro Tools versions like 12 the button will go bright orange to remind you the function is off which is very handy.
Moving through the session
My workflow is based on the mouse wheel because that's what I had when I started with Pro Tools. It might not be the fastest or most efficient way of working but it’s what I’m used to and I can move pretty fast through a session with this method.
I use the mouse wheel to move horizontally and I like to use the "Mouse Wheel Scrolling Snaps to Track" feature (Pro Tools preferences > Operation > Misc) so every mouse wheel click is a track's length.
To move horizontally, I use Shift + the mouse wheel. To zoom, I use Alt + the mouse wheel or the R/T keys.
| Shortcut | Description |
| Shift + Mousewheel | Move Horizontally in the timeline. |
| Alt + Mousewheel | Zoom in and out. |
| R | Zoom out. |
| T | Zoom in. |
Automation
You don't usually need to do complex automations while designing but here are some handy shortcuts to speed you up so you can focus on the actual sound design. One of the most tricky and annoying things is to move automation around and to automate one or more parameters on a plugin. These shortcuts may help. For accessibility, I'll avoid talking about HD features.
| Shortcut | Function | Comment |
| "," "." | Nudge automation. | Select a section of an automation curve and nudge it to position. Really useful when you are early or late on a automation pass. (Pictured in the video bellow). |
| Ctrl + Opt + Cmd + Click | Enable automation. | Use it on a plugin parameter to make it "automable" or on the "Plugin Automation Enable" button to enable everything. |
| Ctrl + Cmd + Click | Show automation lane. | Shows the automation lane for the selected parameter. Saves me hours. |
| Ctrl + Cmd + Left & Right Arrow Keys | Change Track View | Flip through track views. Very handy to go betweeen waveform, volume and pan views. |
Import Session Data
This is a very powerful and somewhat overlooked feature that allows you to import audio and other information from any sessions.
The key concept is that you can bring different elements independently. You could, for example, bring one track's plugins or its I/O without bringing any audio.
If you decide to import audio, you can choose between just referencing the audio from the other session or to copying it on your current session's audio folder which would be a safer option.
You can also bring memory locations and window configurations. Remember those fancy window configuration shenanigans I was talking about above? You could import your little creations from other sessions with this!

Show number of tracks
Just go to View > Track Number. Very simple, but sometimes you want to know how many tracks you have used so you can brag about your unreasonable layering needs.
Miscellaneous useful shortcuts
And finally, here are some random shortcuts and functions:
| Shortcut | Function | Comment |
| "*" (Numeric Keyboard) | Enter timecode. | Lets you type in the counter window so you can jump to any point on the timecode. Also, this counter acts as a calculator so you can type + or - to jump a certain amount of timecode forward or backwards. |
| Shift + Cmd + K | Export Clips as Files | A somewhat hidden feature (it's on the clip list window, not the main menus that allows you to quickly export any clip as a separate file. You'll be able to choose the settings of the new audio file but remember this is not the same as a bounce, inserts and sends won't be considered. |
| Alt + Cmd + "[" or "]" | Waveform Zoom | Changes the waveform zoom in or out. Very useful when you need to work with a zoom level that makes sense with the material you have. |
| Ctrl + Opt + Cmd + [ | Reset Waveform Zoom | Resets the waverform zoom in case you want to see how loud a clip really looks. |
| Ctrl + Shift + Arrow up/down or mousewheel | Nudge Clip Gain. | It even works with several of them at the same time. A must if you use clip gain a lot. Keep in mind that you are going to jump in a determined amount of dB that you can change at Preferences > Editing > Clips > Clip Gain Nudge Value. I usually use 0.5 dB but sometimes I like a smaller value. |
| None, Double Click on a Crosfade and select Equal Power. | Equal Power (Crossfades) | Use this when there is a drop in volume on a crossfade. This setting will make the transition much smoother. |
That's it. Questions? Suggestions? Did I forget your favourite trick? Leave a comment!