Soundly: An unofficial user's guide
/September 2017: The original version of this guide covered Soundly 2.0. I will do my best to keep it updated.
April 2018: The guide was updated to include Soundly 2.1 content.
September 2018: The guide was updated to include Soundly 2.5 content.
October 2018: A small update to the guide about a new feature: Sound Collections.
January 2019: The guide was updated to include Soundly 2019.1 content.
July 2019: Added some new features from the 2019.6 version.
April 2020: Added some new features from the 2020.3 version.
Disclaimer: I decided to make this guide because there are almost no resources online for Soundly and I thought it would be something that some people may find useful. This is not intended to be a strictly objective guide, I've included some of my own opinions and suggestions. I don't have any working or commercial relation with the creators of Soundly.
Introduction
Soundly is a audio library management software that lets you organise and tag your sound effects and add them to your projects in a fast and convenient way. It also includes an online proprietary library that you will be able to access in conjunction with your own local files. I'll be using the mac version and shortcuts. Any mac shortcut using CMD can be used on windows with CTRL.
Soundly Overview
Pricing and Accounts
Soundly uses a freemium model. Using the app is free with some limitations. You will only be able to import up to 2500 sounds from your local drive and you will only have access to a selection of sounds from the cloud based Soundly library.
The Pro version allows you to import unlimited local files and lets you access the Soundly online library in its entirety. Additionally, this version allows you to access other third party online libraries within the app. Some of these are free, like the whole catalogue from freesound.org, and others are paid libraries that you can buy via asoundeffect.com.
As you can see bellow, there is also a 24hr pass option that gives you all the pro features in case you just need them for a short period of time.
There is also a multi-user option for companies that gives you the pro features for multiple people and includes shared cloud storage so everyone in the team can access the same libraries.
Audio libraries sources
Your sounds can come from three fundamental sources:
Local: These are the files that you have in your own computer.
Cloud: These are files that are always online and you can access from anywhere.
Network: These are files that are in your local network (but maybe not necessarily in your computer).
Let's see how you can manage files from these three sources.
Importing your local libraries
To import your libraries, you just drag and drop any audio files or folders. Make sure you drop them on the "Local" blue box. The best way to keep things organized is to have each of your libraries on individual folders and drop them all to soundly instead of just importing the parent folder of all these libraries.
This way, Soundly will list all your libraries one by one and you will be able to select which ones do you want to include in your searches. You will also be able to browse through subfolders within each library.
If you bring in loose sound files instead of folders, they will go into a "Loose sounds" folder that will be automatically created.
Managing your own sounds on the cloud
For now, this option is only available for multi-user accounts. When you drag and drop files or folder to Soundly, you will see that one of the blue boxes says "Cloud Storage". Once these files are uploaded you will be able to access them anywhere.
Managing third party cloud libraries
Soundly allows you to access some online cloud libraries with no need for you to have the files locally. If you are a pro user you will be able to access all the libraries listed bellow. In the case of a free user, only a selection of sounds from The Soundly Library will be available.
The Soundly Library: This is general purpose library built by sound designer Christian Schaanning. You will be able to access the whole set of sounds (currently around 10.400 files) if you are a pro user. Free users will just be able to access a selection of around 300 sounds. This ls a quite complete and well tagged library that will be probably enough for an editor or an student and a nice additional bonus resource for sound designers.
Freesound.org library: Soundly lets you access the huge catalogue hosted in freesound.org (around 300K sounds!). Is very handy to have this vast amount of material available to you without the need of jumping to your browser to search and download the sounds by hand. Having said that, freesound.org doesn't always offer the highest quality plus the content is under different creative commons licenses. Soundly will show all these different licenses and you can even set things up so Soundly will only show you creative commons 0 licensed sounds which is a great way to assure you that you are only using public domain material. To do this, just right click on the freesound folder (under "Cloud") and select Creative Commons 0 Only.
The Free Firearm/Medieval Weapon Library: These libraries were produced by Still North Media and financed via Kickstarter. You would need Soundly Pro to access them via the cloud but if you are a free user you can always download them and access them locally.
Free To Use Sounds: Marcel Gnauk is travelling the world while recording hundreds of sounds and these are now included on Soundly.
Paid asoundeffect.com Libraries: Pro users can browse, purchase and access third party libraries via the vast asoundeffect.com catalogue and access them anywhere on the cloud section.
So, as you can see, Soundly cloud capabilities are really about convenience. They give you the ability of searching on all these cloud based sources plus on your local files, all in a single place, saving time and improving your workflow.
Using shared network databases
The 2.0 version introduced this new feature aimed at companies or just groups of people using different clients of soundly locally. To use this feature, you will need the computers to be connected via a local network (LAN). Keep in mind that the database and audio files could be in one of the users computers or even just in a server or machine room computer that all other users will access.
So, why use this and not just local copies for each user? This option allows you to have an unified and centralised database that any user can access, edit and improve upon, instead of a fragmented database that is going to be different for every member of the team. Additionally, this database will update its metadata in real time, without the need for users to restart Soundly or re-import the audio libraries when another user makes any metadata change.
To set up a database, you will need to create it with Database > New shared network database. You will then see the following screen:
As the text above says, the database is stored in a .sdb file and this file should be stored on the same network disk as the audio files forming the library. Click on the folder icon to name the database and locate where do you want to save the database file. As mentioned, it should be saved on your library root folder and on the same disk where the audio files are. Then, you will find these three options:
Duplicate local database: This option will add to your local library folders to your otherwise empty network library.
Password protect: This lets you add a password that any users trying to connect to the database will need to know.
Restrict editing: If selected, unauthorised users won't be able to edit the database content or metadata.
Once your database is created, any user can access it going to Database > Connect to shared network database. As mentioned before, the user will need to have access, via the local network, to the computer or hard drive where the files are. Once connected to the database, the user will be able to search within the library and see any new changes like new folders, files or metadata made by any other user with permission to edit. You can also connect to multiple databases at once.
Using Metadata
Having solid metadata is very important if you want to find the sound you need easily. It's no use to have a great sounding library if the metadata is vague or incorrect.
There are other audio library managing software with far more options to manage metadata but, in my opinion Soundly offers enough features to keep your files well labeled and easy to find. I think most users won't need much more.
By default, when browsing local files you will see the following fields:
Name: The name of the audio file.
Time: The duration of the file.
Format: Sampling frequency + Bit depth when browsing wav files. In case of other formats, it will show the name of the format.
Channels: The amount of channels. Very handy when you just want to see surround files, for example.
Library: The name of the parent folder containing the audio file. Ideally, it should be the name of the library.
Description: Additional information about the file to make it easier to find.
You can also display these additional fields. To choose which fields you want to see, go to Preferences > Display.
Originator: Usually indicates the software that used to create the audio file.
Tape: Number of tape or memory card.
Scene: Name or number of the scene.
Take: Number of the take. Could be useful for different versions of the same sound.
Note: Additional comments.
Project: Name of the project the recording belongs to.
Category: Used for classifying sound effects in broad groups, like "Atmos", "Guns" or "Sci-Fi".
Reference: Could be used to include the name or website of the author or vendor.
Origination Date: When the metadata was embed in the audio file.
Date Added: Can be used to indicate when a library or file was added to Soundly. As far as I know, this field doesn’t populate automatically.
File Format: Shows the file extension (wav, mp4, aiff, etc…)
For my own libraries, I personally use the name field to just state what the sound is in terms of materials, moods and/or actions. I then use the description field to add any additional information that may help locate the sound when searching in the future, even if this information is very different to the original purpose of the sound.
Shortcuts:
CMD + E: Edit the name of the file.
CMD + T: Edit the description of the file.
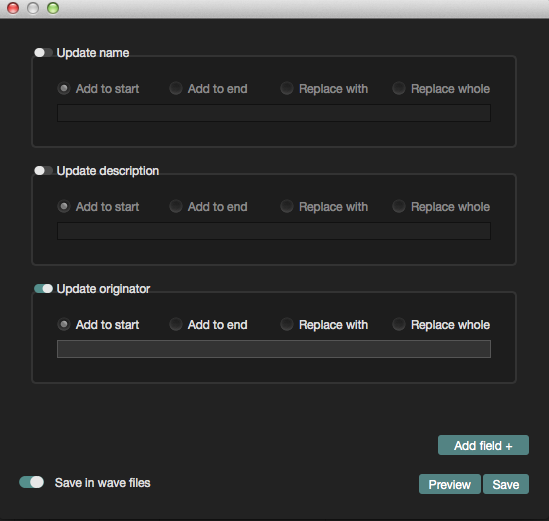
If you select more than one file at the same time and do CMD + T, you will be able to access this following dialogue window. (See picture on the right hand side)
This window will allow you to modify any metadata field of all selected files at the same time.
This are the commands accessible on this window. Keep in mind that any of these commands can be applied to any field that you select with the “Add field+” button.
Add to start: Adds any text to the start of the field. You may need to end with an space to keep things clear.
Add to end: Adds any text to the end of the field. You may need to start with an space to keep things clear.
Replace with: Replaces occurrences of a determined chain of characters with a new one of your choice. Super useful for removing things like underscores and replacing them with spaces, as you will see bellow.
Replace whole: Replaces the whole field with a new text.
Here are some general tips and tricks to keep in mind when editing metadata. Not all of them are necessarily related to Soundly and some are definitely a matter of personal preference but they may be useful to you:
When possible, use wav and interleaved files. In my experience, metadata on some other types of files will be saved in soundly but not on the file itself, so it will be lost if the files are moved or renamed. In my experience, sticking to wav and interleaved is the safest option.
Searches are not case-sensitive but I like to keep everything lower case for the sake of simplicity.
You can use dashes "-", underscores "_" and commas "," to separate words (like sci-fi). Soundly will treat them as spaces.
Soundly 2.1 included an integrated thesaurus. This means that searching "Airplane" will also include "Aeroplane" and "Plane". "Car" will also give you "Auto" and "Whoosh" will get you "Swish" and "Swoosh".
Even though this tip is now not that crucial now that Soundly has a thesaurus, I still think is a good idea to set of words used to describe certain sounds and be consistent with them, specially when two options are possible, like "impact and "hit". Choose one of them and stick with it.
Searching
Searching is very straightforward but I wanted to share some tips and features to keep in mind:
You can use the minus symbol "-" to remove results from your search. For example, if you search for "rock" you may also end up with results referring to rock music. You can then use "rock -music" and hopefully you will filter those unwanted results out.
You can flag your favourite results by right-clicking on the sound and clicking on “Flag” or just using the shortcut F on the keyboard. This is a great way to mark your candidates or favourites after a search.
If you use quotes the result will only return those exact words. "crow" will not return "crowds".
You can see your search history (and go back to any previous search) clicking on the magnifying icon on the left the search box or using the arrows on the right of the search box.
When you do a search, Soundly will give you suggestions based on global sound effect searches.
When doing a search you will also see on the right side hand of the serach box some related searches that you can try based on what other Soundly users search.
Soundly will also suggest spell corrections ala google in case you miss type a word.
Soundly has automatic translation built-in. You can search in your native language and find results in any other.
You can use the advance search panel (click on the faders icon, on the search box right hand side) to specify:
Which languages you want to use.
Which fields you want to search in.
How to sort the results.
Exclude words.
Include exact words.
You can shuffle the results of your search in order to discover new sounds. Do this by right clicking on the header (where you can see the names of each column, Name, Time, Format, Channels, etc…) and selecting “Shuffle search results”.
If you want to do a search just in a group of libraries or folders you can uncheck the rest of folders and just leave those you want to search in.
If you want to search in just one library, you can use the "Search in this library" command that you will see by right-clicking on any of your libraries. You can also select only one particular library by alt-clicking on its check box. Alternatively, version 2.1 allows you to just use the library name on the search field. For this to work properly, you'd need to update the database so Soundly knows the names of your libraries. You can do this in Preferences > Database > Update local database.
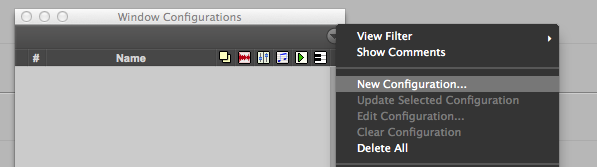
You can save a particular selection of folders to be used while searching. To set this up, first select the folders you would like to be included and then click on the three dots on the right hand side of the SOUNDS tab (see picture bellow). Once on that dialogue, you can name and save your selection or delete previous selections. You can then access these selections using the shortcut CMD + Number.
Audio Operations
There are several audio operations that you can do to your sounds within Soundly. Keep in mind that you won't be affecting the original audio file when using these operations. Let's have a look at them:
You can change the sounds pitch and this will affect its duration too, so this is an old school pitch change where pitch and length are linked. You can do this by using the big slider on the bottom left hand side. There is also an amount setting that you can change to make the change bigger. This setting can be 2X, 4X and 8X. Note that if you change the pitch and then move the sound to to other app you will be moving the pitch shifted version of the file. If you wish to keep your pitch change when you audition a different sound, right click on the pitch slider and uncheck “Reset on new file”.
There is a volume slider next to the pitch control. This will just change your auditioning level and will not affect the sound's level when importing it into other software. You can also use CMD + UP ARROW or DOWN ARROW to control this.
You can change the waveform size or vertical zoom with a slider that is on the right hand side of the waveform display or by using ALT + SHIFT + MOUSEWHEEL. Again, this will just change how you view the waveform, not the actual level of the sound.
You can also zoom in and out horizontally on the waveform using ALT + MOUSE WHEEL or R and T on the keyboard.
Use TAB to jump to the next transient of the sound file.
Use CMD + R to reverse the audio file. This change will be carried forward to other software.
Use CMD + I to invert the channels on an stereo audio file. This change will be carried forward to other software.
Use CMD + N to normalize the audio file. This change will be carried forward to other software.
Use M to sum an stereo file to mono. This change will be carried forward to other software.
Alternatively, you can also right click on a mono file and then click on “To Stereo” to convert it on a “fake” stereo. This is useful when is more convenient to work with stereo or you only have stereo tracks in your project.
Use CMD + LEFT ARROW to use the left channel only on an stereo file. This change will be carried forward to other software.
Use CMD + RIGHT ARROW to use the right channel only on an stereo file. This change will be carried forward to other software.
You can also right click anywhere on the waveform and select “To Mono” and the desired channel or do ALT + CHANNEL NUMBER to isolate just one particular channel on a multi-channel file.
Use ALT + LEFT ARROW to go back to the beginning of the file.
Exporting sounds to other apps
You can export sounds to any audio or video editing software. To do this just select a section of a sound (or the entire file) and drag and drop.
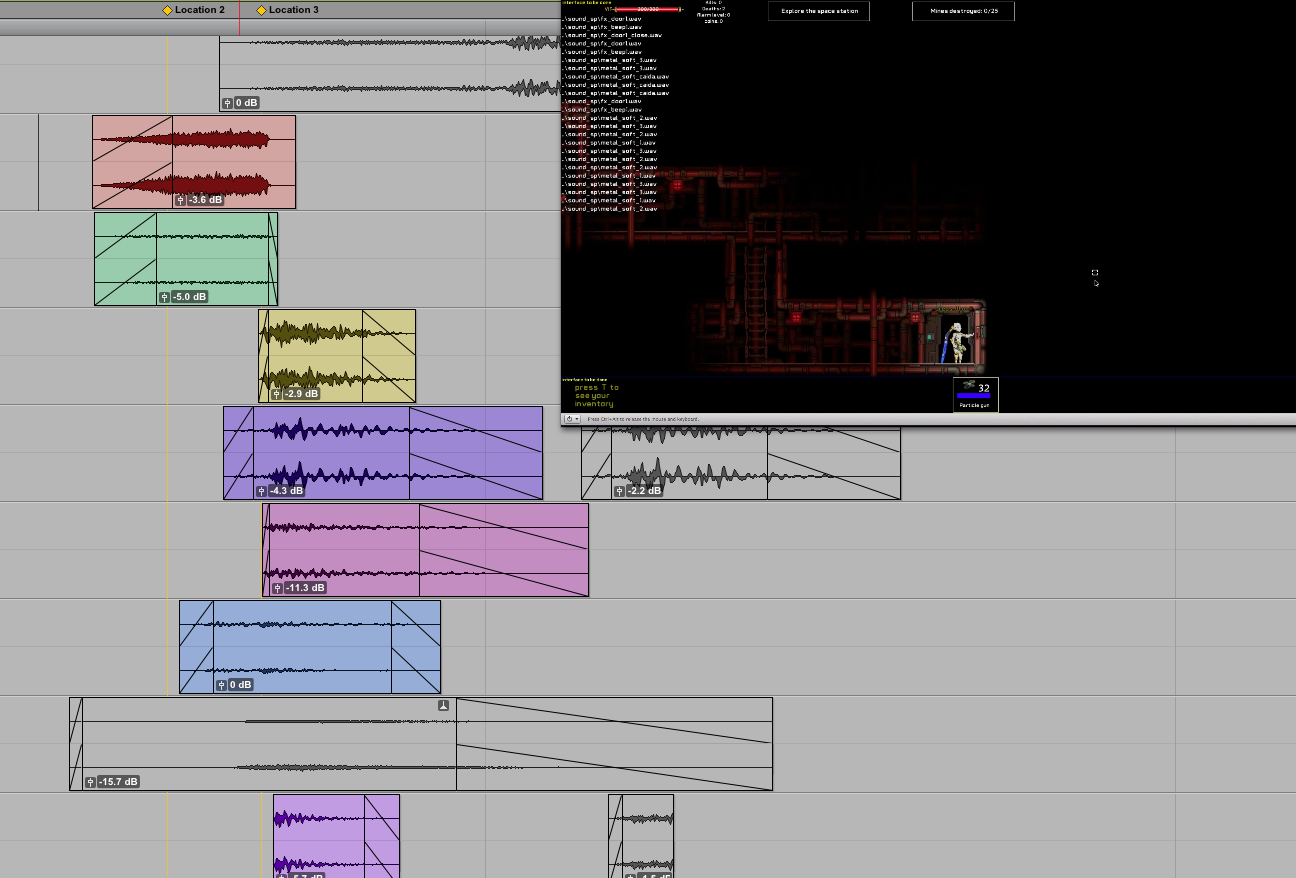
You can also work on Dock Mode, this compact mode allows you to see Soundly and your editing software at the same time. To use this mode just click on "Dock Mode" on the top right hand side of Soundly's window.
Using Dock Mode
Using Soundly with Pro Tools
To spot sound directly to Pro Tools you can either use "S" to spot to the cursor or "B" to spot to the Pro Tools bin. This is the best way to ensure that the sounds are in the session's audio files folder. When spotting to the cursor, make sure you have selected to the proper track beforehand, since Soundly will spot the file to the selected track on Pro Tools. Spotting to Pro Tools will stop playback.
If you are using Windows 10, make sure that you open Soundly with administrative privileges, as this will ensure that Soundly and Pro Tools work together properly.
When spotting a stereo track to a mono track, Soundly will first bring the left channel and then right channel on top of it, so you will end up with just the right channel which is OK if you just want a mono effect. If you want use to use the other channel you can either undo in Pro Tools (this will undo bringing the right channel so you will just have the left channel) or you can just use the commands explained above to just bring the left channel or a mono sum of both channels.
If your selection doesn't span the whole file and you spot to pro tools, you will just bring that particular selection but it will include handles so you will be able to extend the clip if needed. You can also spot multiple files to Pro Tools.
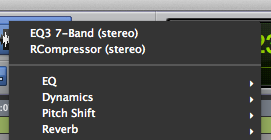
If you need to monitor Soundly within Pro Tools, you can use the AAX plugin that is now included with Soundly. There is also a Rewire plugin in case you prefer that.


Collections
Collections are a great way of saving your favourite sounds per category (Whooshes, Grabs, Night), per client or per project. In the picture on the right, you can see some of the collections I'm currently using to give you an idea of categories you could use.
Soundly already comes with a series of curated groups of sounds to fill specific needs for places, moods or genres. These are the Soundly Collections and are a good way to find inspiration and new sounds that maybe you were not looking for specifically but may fit the scene.
There is also an special collection called Recent that will show you all the recently played sounds, including local and cloud files.
To create a new custom collection, just click on "New Collection" just below your libraries. Name your collection and you can start adding sounds just right clicking on any sound and selecting "Add to collection" and your desired collection.
You can organize your collections in folders and keep in mind that they will also appear in your search results.
The Starred collection is a somewhat special one that comes by default and you can use to tag your favourite sounds.
You can also share any collection with other Soundly users. This is really handy for teams working on the same set of projects. Right click on any collection and select share. You can then add any users using their emails. You can also choose to let them add files to the collection and even give them permissions to manage it.
Settings Page
Access the setting page by clicking on "SETTINGS" on the up right hand side, going to Soundly > Settings or with the shortcut CMD + {COMMA}
General
Output Device: Your Audio output device.
Auto play: When browsing, selecting a new audio file will play it automatically.
Loop play: Files will be played on loop. Shortcut: SHIFT + CMD + L
Start playing on clik in waveform: Turn this on if you want Soundly to autoplay everytime you jump around in a clip´s timeline.
Hide on drag out: Soundly window will hide when dragging and dropping a sound.
Auto resize search result column: When searching, columns will automatically resize to fit the content.
Show channel selecter: Useful to turn on and off individual channels in surround files but you can even activate this for stereo ones.
Reset pitch slider on new file: Activate this to always hear a file´s original pitch when you switch between them.
Remove duplicates search results: Sometimes you have the same file twice in different folders. This options filters out those repeated results.
“Remember me” is on by default: Soundly will remember your user account by default.
Window always on top: Soundly window will always stay on top, useful when using Dock Mode.
Thesaurus: Activate this to get better search results in the same family of names.
Portable mode: Turn this on if you wish to cpy soundly to an external drive and open it in any computer without installation.
Prioritized spotting app: If you are working with Pro Tools and Reaper at the same time, this option will allow you to prioritize one of them when spotting.
Export
File name on export: You can choose if either the file name or the description will be carried when exporting to other software.
Prefix file on export: Add a prefix to everyfile that comes out of soundly.
Output format: The format that exported files will have. It can be the same as the original file ("Same as input") or a custom one.
Local Database
The local database stores Soundly´s knowledge of where all your sounds are and their metadata. From Soundly 2.5 you can create multiple local databases, switch between them and even move them to another computer.
New Local Databse: Use this to build (or re-build) the local database. Useful so Soundly knows the names of each library and understands them when you search. If your library is big, this can take a while, leave it overnight.
Reset local database: Deletes the local database.
Display
You can choose here which metadata fields you want to display.
Offline
Offline License: This options allows you to export and import an offline license if you need to work on a computer not connected to the internet. Starting on version 2.1, Soundly now remembers if you were offline before and will go offline by itself if it doesn't detect any internet connection.
Audio Storage
Audio storage location: If you work with video editing software, Soundly will not automatically save the audio to the project audio folder when exporting. With this feature, you can manually set that path to the project's audio folder. Soundly will save the files you export to this folder whenever your editing software
Cloud transfer quality: If you have a slow internet connection you can use the low quality settings to load the files faster.
Accesability
Font size in search results: Allows you to make the font larger.
Update
Update: Checks if you are using the last version of Soundly.
Pro Tools
If you don´t see this pannel, you may need to open Pro Tools.
You will be able to see here the folder where the audio files that you are spotting to Pro Tools are going. You also have the option to force this to be your Pro Tools session audio folder although if you have “Copy Files on import” in Pro Tools (under Preferences -> Processing -> Import) this may result in duplicate files.
Spot to Pro Tools handle size: You can choose how much handles the size that you are bringing into pro tools will have. 30 seconds is the default (and is probably plenty) and you can also choose to import the whole file.
Premiere
If you are a Premiere user you can choose wether you want spotted files to be saved to a folder realtive to your current project.
ReWire
ReWire: Rewire lets you audition Soundly through a track in your DAW. Specially useful if you use Pro Tools HD.
Networking
Networking: Use this option if you are accessing the internet through a proxy server.
Soundly shortcuts
CMD + E: Edit the name of the file.
CMD + T: Edit the description of the file.
CMD + Number: Activates a saved folder selection preset.
CMD + [COMMA]: Preferences page.
CMD + UP or DOWN ARROW: Changes audition level.
TAB: Jump to the next transient.
ALT + MOUSEWHEEL or R & T: Horizontal Waveform Zoom.
ALT + SHIFT + MOUSEWHEE: l: Vertical Waveform Zoom.
OPTION + LEFT ARROW: Go back to the start of the audio file.
CMD + R: Reverse an audio file.
CMD + I: Invert the channels on an stereo audio file.
CMD + N: Normalize audio file.
CMD + SHIFT + R: Reveal in finder.
CTRL + SHIFT + R: Show in explorer.
M: Sum an stereo file to mono.
N: Sum to stereo.
F: Flag sound.
CMD + LEFT ARROW: Use the left channel only on an stereo file.
CMD + RIGHT ARROW: Use the right channel only on an stereo file.
ALT + CHANNEL NUMBER: Use only the desired channel on a multichannel file.
SHIFT + CMD + L: Toggle loop play on and off.
Features for the future
This just a compilation of ideas from myself and other colleagues that we would love to see in Soundly in the future. If there is anything that you think is missing here, leave a comment and I'll add it to the list. As you can see, some features were added
Spell correction in search bar.Added in 1.2File descriptions get updated in real time between different users accessing the same files.Added 2.0A button allowing you to "Go back" to previous page.Added in 2.0Ability to spot to pro tools with handles.Added in 2.0Being able to use "" to search for concrete words but not words containing them. So, if you search for "car", you won't find cartoon or cardboard.Added in 2.1More metadata fields or even custom metadata fields.Added in 2.1Sort playlists in folders and share those folders.Added in 2.5- Being able to edit more than rule at once for a certain field. For example, we would want to add "speed" to the end of the description and also replace all instances of "vehicle" with "car" within the description too. This would be very handy when re-naming big libraries.
- Search statistics. Being able to see what you search the most would be awesome.
- Multi-edit is great because of the replacing tools and sometimes I'd love to be able to do it on just one file.
- Being able to do conditional formatting on metadata. For example, being able to tell Soundly: within this selection, if you see the term "wind", add "ambience".
- Add local tags tied to your account to cloud libraries.
- Being able to add tags in a particular time along a file's waveform.
- Right click on a Freesound track has an option to open that sound's page on a browser.
- Spotting to a Stereo Pro Tools track that has elastic audio activated will result in an error.